Blog
Learn How to Calibrate a Pressure Transmitter
Learn How to Calibrate a Pressure Transmitter
April 15, 2017
Transmitters are used in the process industry environments to measure pressure and other parameters. The plant operators rely upon these devices for accurate measurements and process optimization. The performance of these transmitters may weaken with time due to several factors. This is when they need calibration.
During calibration, a comparison is made between the current reading and the standard set reading. This helps plant operators determine the shift in readings and make necessary adjustments.
The calibration procedures may slightly vary across the types of branded pressure transmitters due to their designs. However, there are some general steps to follow before calibrating your transmitter. This post discusses them all.
Basic Setup for Calibrating a Pressure Transmitter
Following are the basic steps before starting the actual calibration.
- Read Instruction Manual: The transmitter can be easily calibrated following the manufacturer’s specific instructions on calibration, provided with the equipment. Read the instruction manual carefully to understand different steps involved in the calibration. Additionally, you can refer various videos available online to understand the procedure.
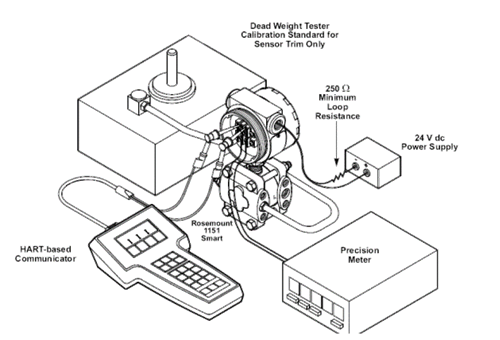
- Arrange All Instruments Needed for the Calibration: Using a proper instrument is a requisite of any calibration procedure. Arrange all instruments needed for calibration such as pressure gauge, digital multimeter, pressure source, and power supply module (24V). Ensure that the readout device and pressure source used are of great accuracy than the transmitter to be calibrated. Accurate measurements cannot be achieved, if low accuracy equipment are used for the calibration. The instruments used for the calibration of pressure transmitter should be regularly tested to ensure they are working perfectly and serving their purpose.
- Record Important Information: Before starting with the procedure, you need to record the following information:
- Transmitter Model
- Calibration Range
- Transmitter Maximum Working Pressure
- Transmitter Span
- Follow the Diagram: Most instruction manuals provide the pressure transmitter calibration connection diagram, or you can download the one from the Internet. Connect all equipment appropriately as mentioned in the diagram. To avoid any mistake, you can take several printout of the diagram. You need to pay attention to power source as well as polarity of the transmitter.
- Prepare the Instrument for Calibration: Mostly the calibration is done in either of the two ways:
- Bench Top Calibration: This is a procedure, where the transmitter is calibrated at a bench using various calibration devices.
- Field Calibration: This is a procedure, where the actual calibration is done as per the tips mentioned in this post.
In both of the above-mentioned types, the low port of the transmitter cell is vented to atmosphere, and the high port to a pressure source. Examples of high port include pneumatic calibrator, pressure regulator, or a hand pump.
After setting up the connection, switch on the power supply, and pressurize the high port. Record the reading of current (mA) and this will be the first reading. Continue pressurizing the transmitter, and record readings in five points – 0%, 25%, 50%, 75%, and 100%. Take down readings for increasing, as well as decreasing input values and corresponding output values.
After the initial setup, you can start with the actual calibration. In the next post - How to Calibrate a Pressure Transmitter – II, we will discuss steps for calibrating the pressure transmitter.
- Comparison between Multi Valve Manifolds Block Valves and Bleed Valves
- Understanding Electrochemical Detection: Principles, Techniques and Environmental Application
- How Can Greenhouse Gas Emissions Be Reduced?
- Pneumatic Pressure Controllers: A Safe Choice for Hazardous Areas
- A Practical Guide to Vacuum Measurement and Operation
- Understanding Electrochemical Detection: Principles, Techniques and Environmental Application
- How Can Greenhouse Gas Emissions Be Reduced?
- Pneumatic Pressure Controllers: A Safe Choice for Hazardous Areas
- A Practical Guide to Vacuum Measurement and Operation
- An Unconventional Guide to Selecting the Right Pressure Sensor
QUICK ENQUIRY